

What led us here
In the previous parts (Part 1, Part 2), we were building a command line tool to interact with objects in the Jamf Pro API. In the most recent part, we improved the error handling and implemented a protocol to share common between types. You may review the sample code up to this point.
In this part we check the usefulness of the protocol by implementing a new type of object in the Jamf API. Then we will teach our command line tool to read arguments from the command and add functionality to read passwords from the keychain.
More objects
The real test on whether our JamfObject protocol is useful is to implement another object from the Jamf API and see how much work it is. When you want to learn about the API, you can go to Jamf’s Developer pages. But there is also an interactive page included with every Jamf instance. When you add /api to the base URL of your Jamf Pro server in the web browser, you can interactively test out API calls and see the JSON it generates. This can be very helpful for testing.
For this example, I want to create a Swift struct to model the script's endpoint. Search for scripts in the list and run the first API call /v1/scripts to get a list of all the scripts in your Jamf Pro. When we look at the JSON result data, we will recognize the standard results dictionary with a totalCount and an array of script objects. The JSON for each script item looks something like this:
As an exercise, you should try and create the Swift struct to model this data yourself first. Then change the code in the JamfList main method to get and loop through a list of script objects and print (at least) the name and scriptContents of each script.
You may notice that the extra error handling we added to the default getAll method is really helpful when you make mistakes in modeling the property names or types to match the JSON data.
You will find a solution in the code example here.
While modeling the data for a new object from a Jamf API call is still not trivial work, the default behavior implemented by the JamfObject protocol does allow us to focus on that task. We do not have to reimplement the behavior for the API calls over and over again.
Let’s have an argument
We now can fetch and decode three kinds of objects from the Jamf Pro API. We have replaced the code to fetch and print the data from the different objects in the main function a few times. Let’s add an argument to our command line tool which tells it which type of object it should list.
In Swift, you can access the arguments passed in using CommandLine.arguments . As is typical in shell commands and scripts, the first item in that array will be the path to the binary itself, the remaining items, if any, will be the actual arguments.
Replace the code below the import statement in the JamfList file with this:
First, we create an JamfType enum listing all the types our tool can work with. The enum is of type String. This allows us to initialize a value of a JamfType variable with a string we get from the argument.
Then we check if there are more than one arguments. Remember that the command itself counts as the first argument. If there is only one argument, we exit with an error message.
Enumerations: Count the ways
Swift relies more on enumerations than other programming languages. If you are coming from scripting languages, they might be an entirely new concept for you.
We use the rawValue initializer to create a enumeration type variable from the argument string. When this fails, most likely because the argument doesn’t match any of the values enumerated in JamfTypes, we show a message and exit with a different error code.
You might be tempted to use "raw" string literals instead of an enum type here. Then you would sprinkle comparisons to "category," "computer" and "scripts" string literals throughout the code. This has a few downsides.
First, when you want to change any of the values, or add to the list, there will be several locations where you have to update the literals. Second, when you have a typo in one of the string literals, say "caetgory" instead of "category" or "computers" instead of "computer," then your code will not work as expected. These typo errors in literal strings are very hard to find. When you use enum values instead, the compiler knows which values are allowed and will recognize and show errors on typos.
Another benefit of using a enum is that we can build a complete or exhaustive switch statement, which you can find after the command that fetches the authentication token. Here we switch on the type variable and since we, and the compiler, know which values are possible, we don’t have to implement a default case. Depending on the value of the type variable, we fetch different objects and print different information.
Let’s assume you model the data for another type in the Jamf Pro API, for example a Building type, and you add that to enum of JamfTypes by adding another line: case building .
When you do that, Xcode will show an error at the switch statement. The switch is not "exhaustive" any more. This means that one of the cases of the enum is missing in the switch statement. There is even a "Fix" button to add the missing cases to the switch statement.
Adding arguments in Xcode
When you run this code in Xcode, it will print the usage string and return an error:
This is "expected behavior," because now the tool requires the data from arguments to run, but Xcode doesn’t provide any arguments when we run the project. There are two solutions to this and both are useful in different circumstances.
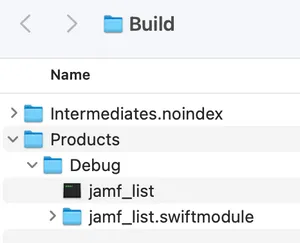
In Xcode, first select “Build” from the “Product” menu, to make sure the project is freshly compiled with all the code changes. Then, you can select “Show build Folder in Finder” from the “Product” menu. This will open a Finder window to the location where Xcode actually builds the binary.
There will be a “Products” folder with a “Debug” subfolder. Inside that “Debug” folder is the actual binary that Xcode has built for us. There will be other folders with temporary build data, but they are not interesting to us now.
Open Terminal. Drag the “Debug” folder onto the Terminal icon in the Dock. This will open a new Terminal window with the working directory set to this Debug folder. Then you can run the command in Terminal:
The location of the build folder and of the binary that Xcode builds will not change. So going forward, you can just re-build in Xcode (command-B), switch back to this Terminal window and try again. Using the Terminal interactively is very useful when you want to quickly iterate through different sets of arguments.
We can also tell Xcode to add arguments when it runs the command line tool inside its interface. This is very useful when you want to use the debugger interface.
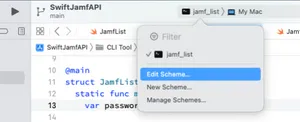
In the toolbar, click on "jamf_list" to get a menu. Select "Edit Scheme…"
(You can also find this in Product > Scheme in the main menu bar)
In the dialog that appears, select "Run" in the left column, then select the "Arguments" tab. Add the type you want to test with, e.g. computer in the "Arguments passed on launch" area. You can add more arguments here, one for each value, and disable the ones you do not want to use with the checkmarks.
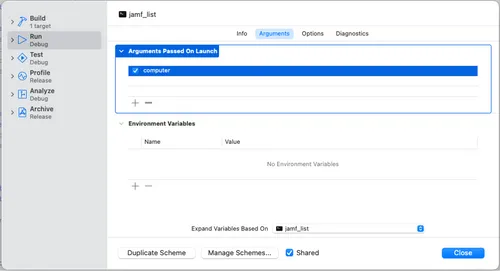
Now run the project again. If you entered the arguments correctly, the tool should work.
Note: Interacting directly with the CommandLine.arguments array is suitable for very simple argument parsing logic. If you want or need to do something more complex and resilient, you should explore a library that does it for you. One example is the swift-argument-parser package. I built a different tool using swift-arguement-parser for another presentation last year.
Keychain
Up until now, our code had the username and password for the Jamf API hardcoded as username and password variables along with the server variable with the server base URL.
This is obviously not ideal. The password is sensitive information that should not be stored in code anywhere. These variables will also be different for every Jamf deployment. What we want to add is a secure means of providing the server and login information when the command line tool, and later the app, runs.
We will approach this two ways. First, we will add the code to get the server, username and password from the command line arguments and then, in a second step, we will add code to get the password from the keychain, when it is not provided as an argument.
In the JamfList file, replace the code before the do block with this:
In the "Edit Scheme" window, add the server, username, and password as arguments, ensure they are enabled and run the project again. You can also re-build the project and run it from Terminal with all four arguments.
Looking for the key
While getting the data from command line arguments is better than hardcoding them, having the sensitive password in an argument is still not ideal. We still need to store the password in Xcode and any other script that might call our tool.
macOS and iOS have the keychain where the user and apps can store the password in a safe manner. The code required to access data in the keychain is not very complicated. However, the functions to interact with the keychain are part of CoreFoundation, which means they have a strange C-like syntax.
Create a new file with the name Keychain and add the following code below the import statement:
Rather than putting the code for the keychain access in our main code, we are putting it into its own type immediately. The Keychain type has an enum of errors. We have seen such custom errors with JSONDecoder and we created our own JamfAPIError in an earlier part.
Things can go wrong when interacting with the Keychain API, and throwing errors like this is a useful way to communicate this to the calling code.
Then we have the getPassword function which, as the name implies, gets a password from the Keychain, given a service (the server URL) and an account name. The code is modeled after Apple’s sample code for searching Keychain items.
With the Keychain struct in place, we can replace the comment with the // TODO: marker with this:
The error handling here does not distinguish between the different errors that the getPassword function can throw, but it will serve well enough.
Since the goal is to not require the password in the arguments anymore, return to the Edit Scheme window and remove the password argument. You could also disable it, but since our goal here is to not have to store the password anywhere in the project, it is better to remove it.
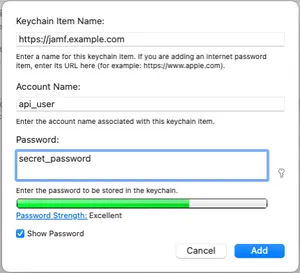
When you run the project with this, you will get the message “Could not get password from keychain” with an error number of 2. This is expected, because you (probably) have not stored the password in your keychain yet. Open the Keychain Access application, make sure you have selected the "login" keychain, then select "New Password Item" from the "File" menu.
In the window that opens, enter the server URL (including the https:// ) as the "Keychain Item Name," the user name as the Account Name and the password in the "Password" field. Then click "Add."
Note: It is important to create the password item in the "login" keychain. The iCloud keychain has stricter security restrictions than the login kechain. It is possible but quite difficult to let a command line tool access keychain items in the iCloud keychain, but that exceeds the limits of this tutorial. This is also the reason our command line tool cannot find passwords you may have stored when accessing the Jamf interface in Safari.
When you run the tool again, it should retrieve the password from the keychain. You will get a prompt to authorize the access to the keychain. Confirm with your password. Click "Always Allow" to avoid this prompt every time you run the tool.
The Keychain file in the sample includes additional functions to save, update and delete an item in the keychain, all based on Apple’s sample code. We will need these later when building the UI application.
Done with the command line
We built a command line that can list data from different objects in the Jamf Pro server. You can find the sample project up to this point.
While there is certainly some usefulness to such a tool, we built it mainly as a stepping stone. We learned how to do asynchronous API calls with Swift and how to decode the JSON data into Swift objects. We identified code that can be reused for many different objects in the Jamf Pro API and created a Swift protocol. We connected our tool to the macOS Keychain. Building a command line tool first, allowed us focus on the essential data model without the distraction of creating a user interface.
With the data model in place, in the next part, we can start building an application with a user interface by adding a SwiftUI app to our project.
Find out more about harnessing the potential of the Jamf API!


by Category:
Have market trends, Apple updates and Jamf news delivered directly to your inbox.
To learn more about how we collect, use, disclose, transfer, and store your information, please visit our Privacy Policy.